How to connect the camera to the PC via LAN cable so that it is recognized?
The SMTAV camera has a default IP address which is 192.168.100.88.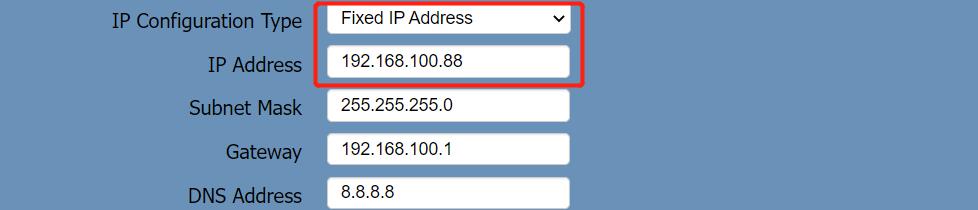
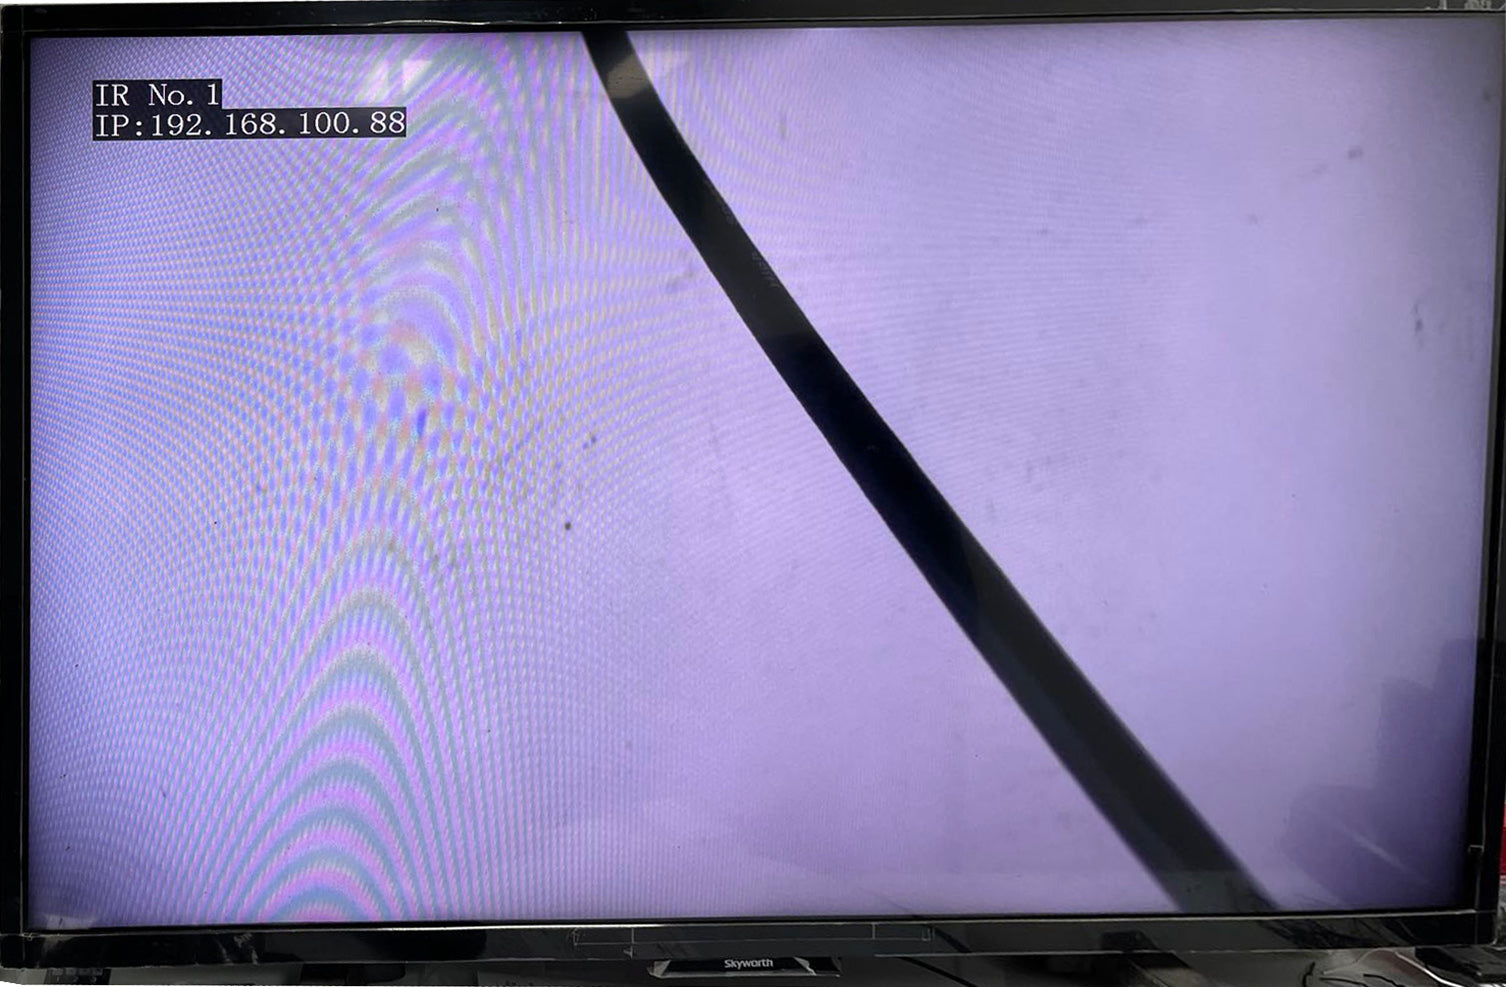
If you have connected the camera's HDMI to a monitor or display device. When the camera starts up, the IP address of the camera will be displayed in the upper left corner of the screen.
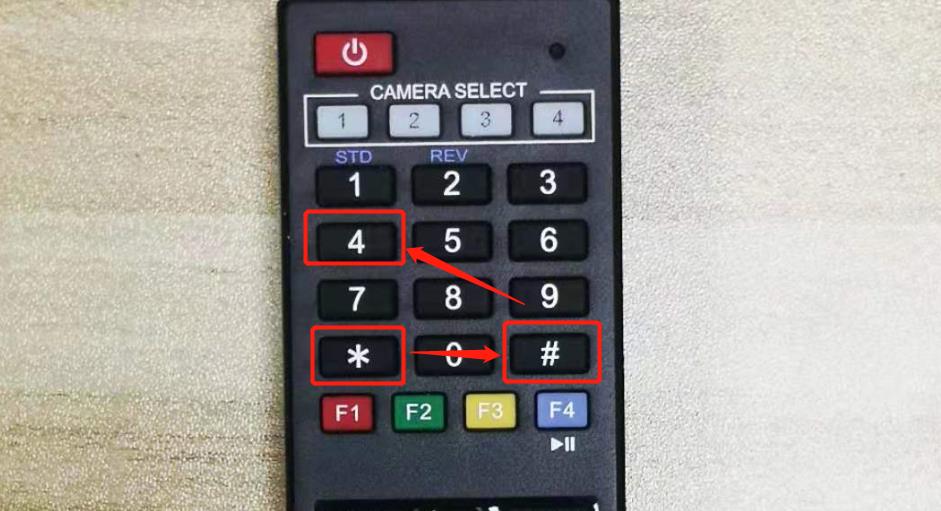
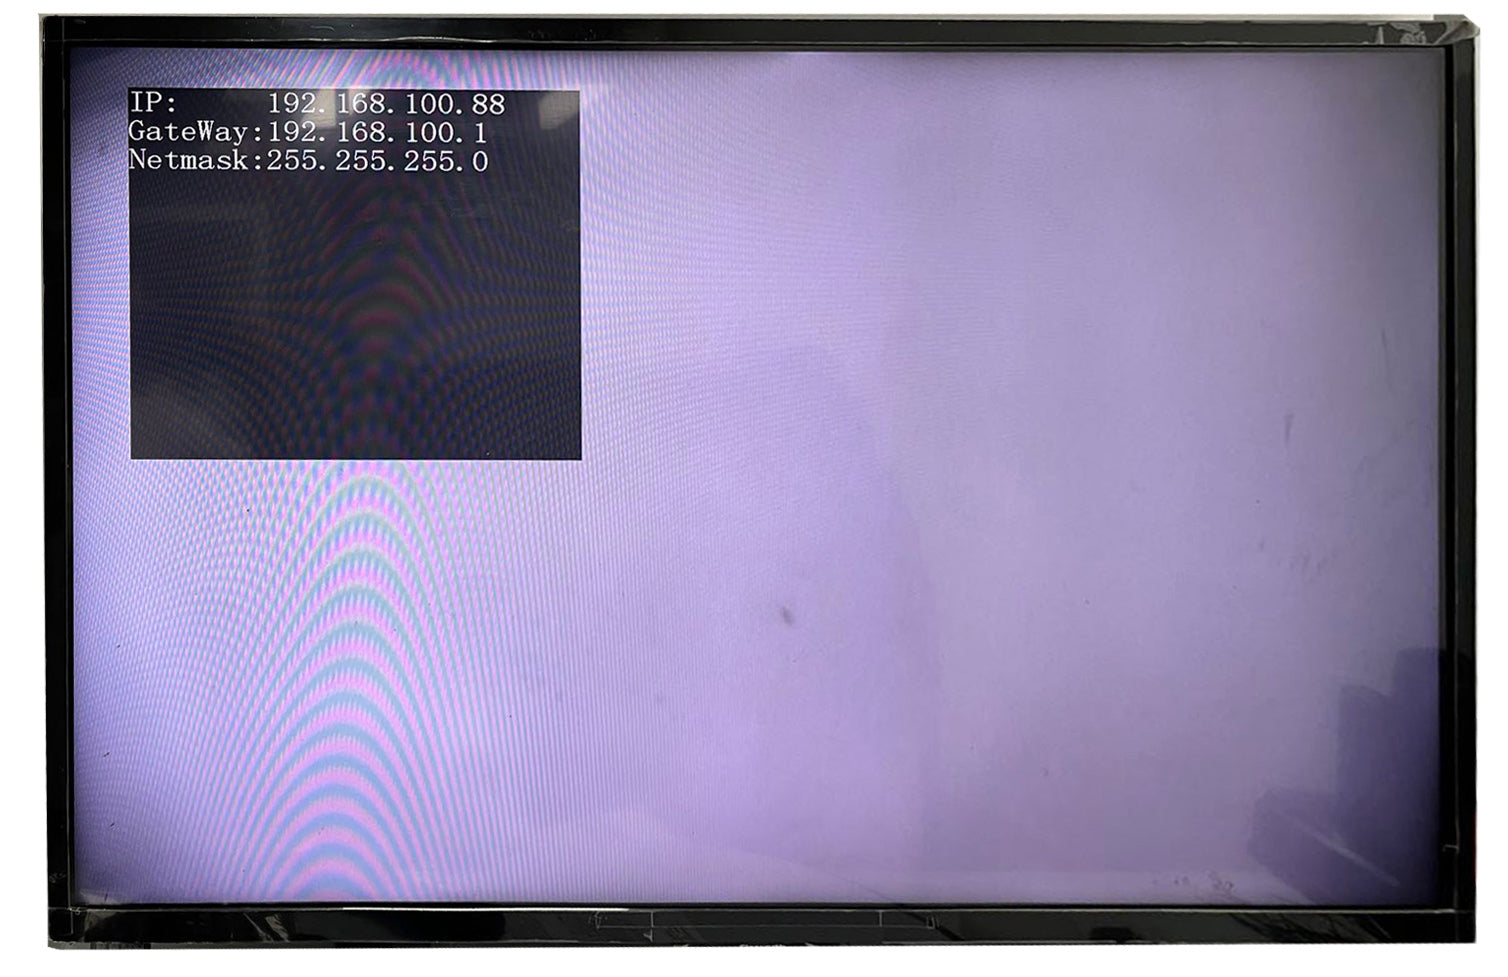
If the camera is already turned on, you can press the * # 4 button in sequence on the camera's remote control, the camera's IP address, gateway and subnet mask will be displayed on the display screen
Connect the camera directly to your computer through a network cable (if your computer has an RJ45 interface), or connect the camera to your router, and then connect your computer to the router through a network cable or WIFI(wireless).
NOTE: Depending on your conditions or needs, either method will do.
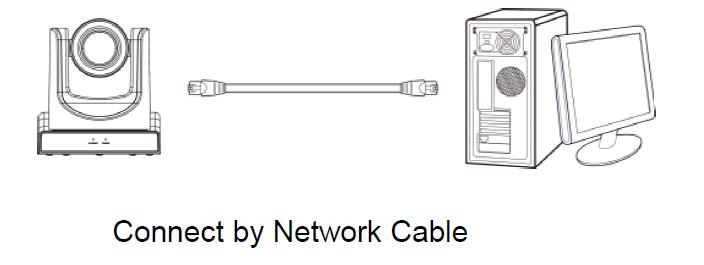
1. Connect the camera directly to your computer through a network cable
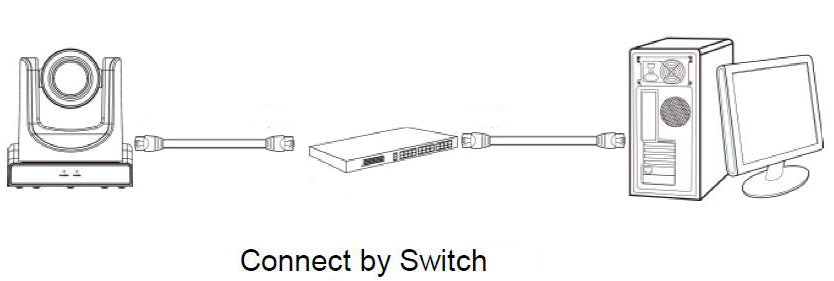
2.Connect the camera to your computer via a switch or router with network cable
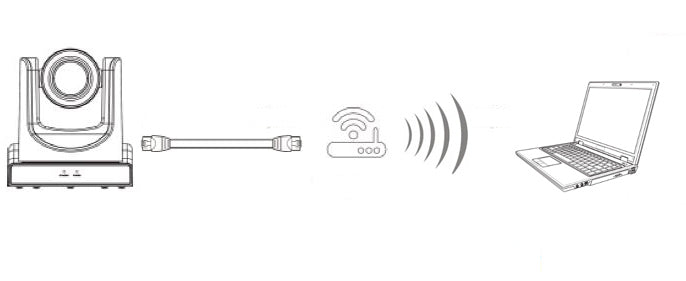
3.Connect the camera through a switch or router with a network cable, and connect your laptop to the router through WIFI (wireless)
Change your computer's IP address to 192.168.100.xxx (xxx is an integer from 2-254 except 88)
You can refer to: How to configure TCP/IP Properties of the Wireless Connection on my computer (Windows XP,Vista,7,8,10,Mac) to Access SMTAV IP Cameras?
Here is a detailed guide on how to set your computer's IP address to 192.168.100.xxx(xxx is an integer from 2-254 except 88)
If you need to discover the IP address of your computer, you can do so by using command prompt for Windows or Terminal for Macs.
To do this on a PC, you would type “CMD” into your search bar in the Windows menu. You should see a black box pop up with the ability to type in the box. If you type “ipconfig” and hit “Enter” on your keyboard you will see a bunch of information pop up in your command prompt.
On a MAC or Linux computer, type "ifconfig" in the terminal and hit enter.
NOTE:After setting your computer's IP address to 192.168.100.xxx, you may temporarily lose access to Ethernet. But this is only temporary, we will change it back when we finish setting up the camera.
Then use a web browser to access the IP address of the camera (192.168.100.88), and you will be prompted to enter the user name and password. The initial username and password are both admin
After entering the correct username and password, and hit enter key on your keyboard, you will open the camera's WEBUI
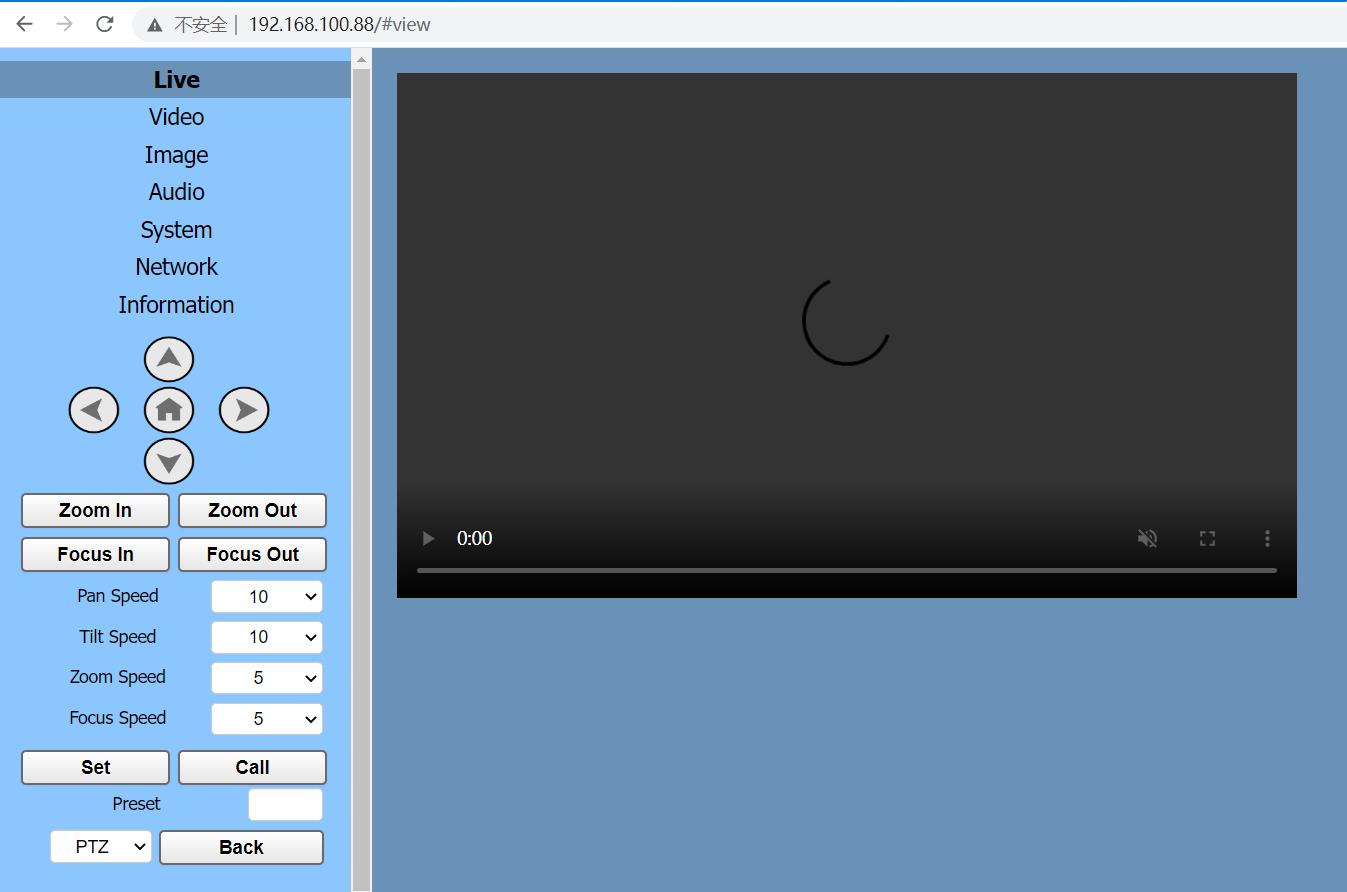
In the NETWORK tab of the camera's WebUI, you can change the camera's IP address, subnet mask and gateway. then click “Submit” and restart the camera(turn off then on).
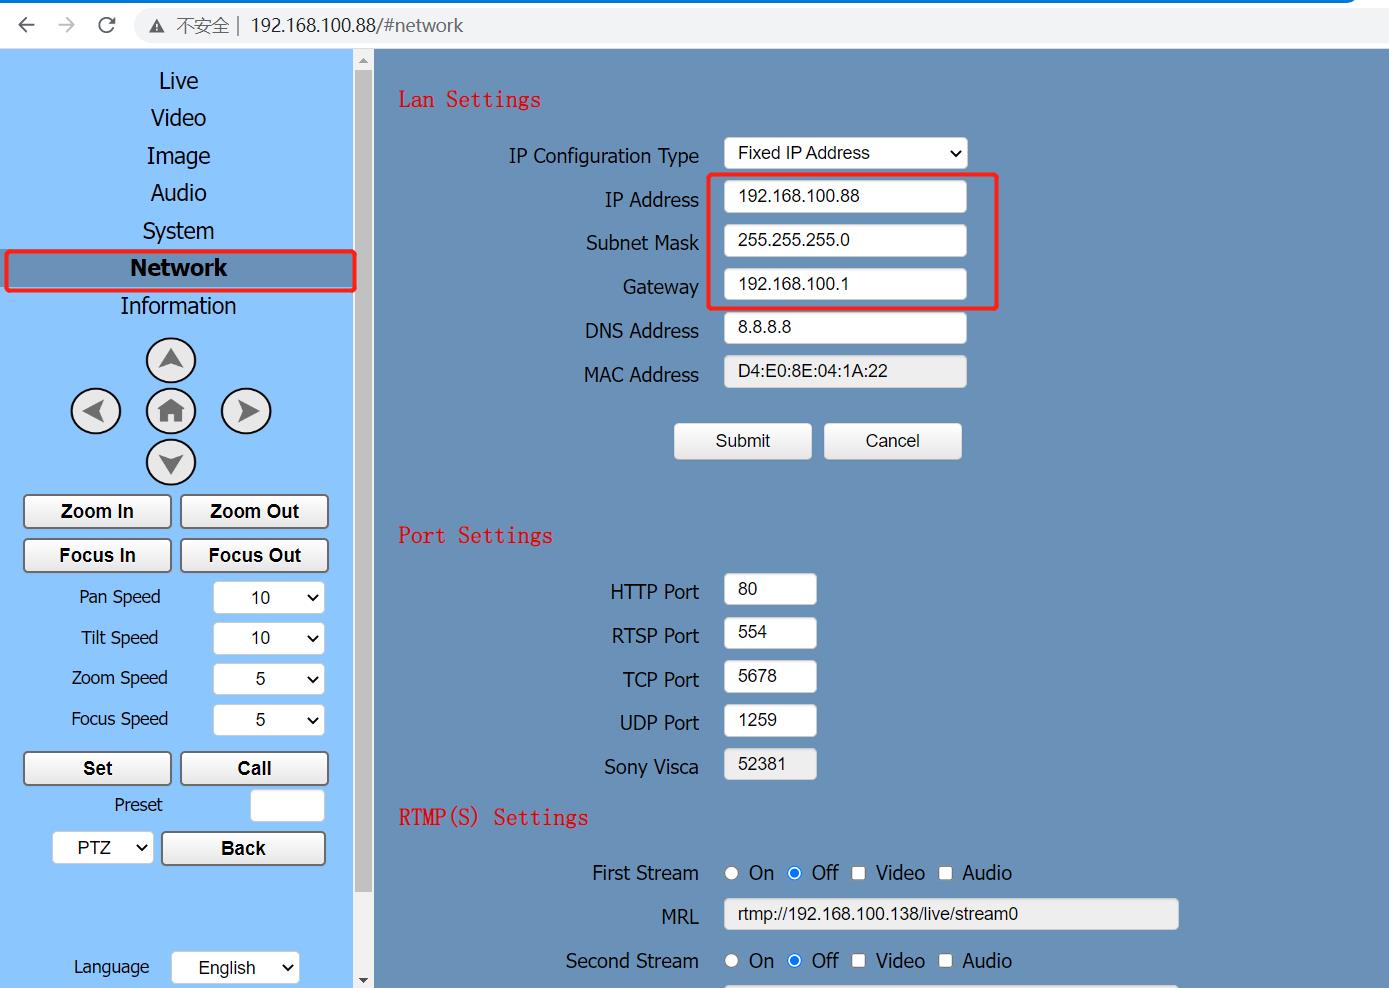
NOTE:It is better to use a fixed IP address, because if you set it to a dynamic IP address, the IP address of the camera will be reassigned every time the camera restarts.
If you want to access both the external network and the camera, you need to change the camera's IP address to the address range allowed by your router.
If you have multiple cameras, please set them one by one, and each camera should be assigned an IP address, which cannot conflict. After the setting is completed, connect them to the network together.
After changing the IP address of the camera, please use the same method to set the IP address of your computer to the original address or enable DHCP.
This blog post is a lifesaver! As someone who always struggled with the technicalities of connecting a camera to a PC via LAN cable, this guide came to my rescue. The step-by-step instructions are incredibly user-friendly, making the process seem much less daunting. What I appreciate the most is the clarity in explaining the intricacies of the connection, ensuring that even those without a tech background can successfully set up their cameras. The troubleshooting tips provided are an added bonus, addressing potential hiccups along the way. Kudos to the author for simplifying what can be a complex task and empowering users to effortlessly connect their cameras to their PCs. A must-read for anyone looking to enhance their surveillance setup!
I hope this email finds you well. I wanted to take a moment to discuss how our Monthly SEO Services can significantly impact your business’s bottom line, driving both profit and sales growth.
1. Increased Visibility, Increased Sales
2. Targeted Traffic for Conversions
3. Enhanced Conversion Rates
4. Competitive Edge in Sales
5. Measurable ROI
6. Adaptation to Market Trends
We’d be thrilled to discuss how our tailored Monthly SEO Services can specifically contribute to the profitability and sales growth of your business. When would be a convenient time for a discussion? Let’s collaborate to unlock the full potential of your online success. Find out more at https://alwaysdigital.co/r
Hello Team,
I’m not your typical Business Development Manager here at Estura Software Company, and I’ve got something exceptional to share with you.
Picture this: a “secret sauce” that’s been powering your competitors all this time.
What if I told you that within just 24 hours, you could have a comprehensive list of potential business clients ready for you to connect with?
Introducing the world’s most powerful lead generation desktop software. With this tool in your arsenal, you can effortlessly scrape unlimited contact details from various platforms, including Google Maps, Trust Pilot, Yellow Pages (USA, UK, and Canada), LinkedIn People, LinkedIn Company, and LinkedIn Sales Navigator.
Using this software is a breeze. You input your keywords, select your platforms, fine-tune your settings, and let the magic happen. It scrapes these platforms, collects vital business contact information, and neatly compiles it into a single file. To make the most of this software, we recommend diving into our detailed tutorials. Once you’ve got your list of potential clients, you’re all set to connect with them via email, phone, social media, and more.
Here’s the kicker: I’m offering you a FREE TRIAL of the FULL VERSION for an entire month. No hidden charges, no credit card details needed. Generate unlimited leads for your business for an entire month for FREE!
I have already pre-approved smtav.com for a 30-day free trial. To activate your free trial, head to https://estura.co.uk/free-demos/
Make sure to enter your full business name and smtav.com inside the request form to activate your free trial.
Best wishes
Christiane Frederic (Your awesome friend at Estura)
Iceland, NA, Hvolsfollur, 860, Klausturvegi 46, 413 8653 (That’s where the magic happens)
By way of introduction, I am Scott Gould with Consumer Products International, a leader in sales, marketing, and distribution, connecting product manufacturers with major retailers within the United States.
Discover how we can help you expand your reach and bring your products to American consumers.
For more information on distribution please visit: http://go.consumerproductsintl.com/cpi-2019/
Let’s explore the possibilities of collaboration. Contact us at 1-561-544-0719
I have 2 SMTAV HD Video Cameras, Model: BA30N. I am desperately trying to integrate them into 2 existing PTZ Cameras (not SMTAV) in a church system. I am using a closed network for the cameras rtsp:/10.1.10.101/1, rtsp:/10.1.10.102/1 (for the existing cameras) and rtsp:/10.1.10.103/1 & rtsp:/10.1.10.104/1 for the new SMTAVs. I see all 4 cameras via the Joystick Controller and can interact with them BUT the will not load in OBS, which needs to happen for us to keep these new acquisitions. There does not seem to be a logical reason. I was told that they might need an older firmware for them to be recognized by OBS as there are similar occurrences with the more expensive PTZ Optics brand. Have an old and the newest version of OBS with the same results. Do you have any thoughts of a resolution?